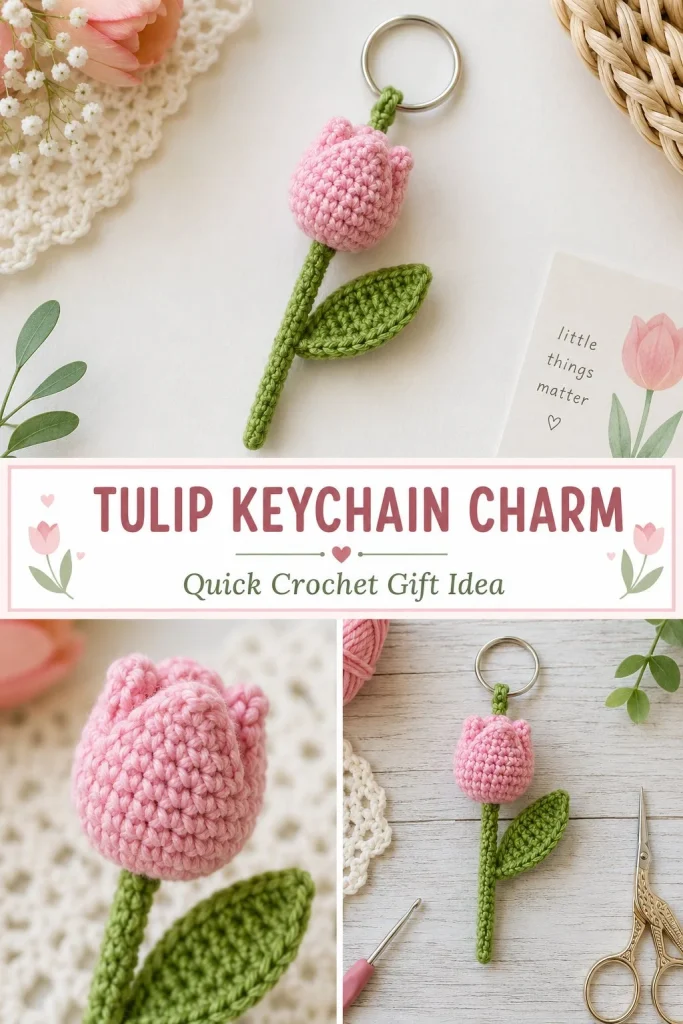
This charming tulip keychain charm is a small but delightful crochet project that adds a touch of handmade beauty to everyday items like bags, keys, or backpacks. The finished flower measures about 8 cm (3.25 inches) long, not including the key ring, making it a perfect size for a cute, cozy accessory that’s also practical for organizing your keys. Designed using US crochet terms and worked in continuous rounds, the pattern is straightforward but offers enough detail to keep intermediate beginners engaged. A nicely stuffed bud and carefully shaped petals give the tulip a neat, realistic look. If you’re looking for a quick, satisfying project to brighten your day or give as a thoughtful handmade gift, this keychain fits the bill. For a little extra fun and variety in your keychain collection, I recommend checking out a complementary design like the 15-minute no-sew pocket bunny keychain crochet pattern, which pairs well with this floral charm.
Why You’ll Love This Crochet Pattern
- Compact and portable project perfect for quick gifting or stash busting.
- Worked in continuous rounds to simplify construction and avoid seams.
- Clear step-by-step instructions ideal for advanced beginners looking to improve shaping skills.
- Uses basic crochet stitches with easy-to-follow shaping for petals and leaf.
- Includes stuffing to add a soft, tactile feel that maintains the shape well.
- Customizable with different yarn weights or colors to create seasonal or personalized charms.
Finished Size
The final tulip keychain charm measures approximately 8 cm (3.25 inches) long, excluding the key ring. Note that the size may vary slightly depending on your yarn choice, hook size, and personal crochet tension.
Skill Level
Advanced beginner. This pattern uses familiar stitches like single crochet (sc), half double crochet (hdc), and double crochet (dc), but shaping the petals and assembling the pieces requires some attention to detail. It’s a great next step after basic amigurumi or accessory projects.
Materials Needed
- Sport or DK cotton yarn: approximately 15g pink (for the tulip bud) and 10g green (for the stem and leaf)
- 2.75 mm crochet hook
- Small amount of polyester stuffing
- 20–25 mm metal key ring
- Yarn needle for sewing and weaving in ends
- Scissors
- Stitch marker (optional but helpful for keeping track in rounds)
Stitches and Abbreviations
- MR: Magic Ring (creates a tight closed center)
- ch: chain
- sl st: slip stitch (used for joining and shaping)
- sc: single crochet (insert hook, yarn over, pull through both loops)
- hdc: half double crochet (yarn over, insert hook, yarn over, pull through, yarn over, pull through all three loops)
- dc: double crochet (yarn over, insert hook, yarn over, pull through, yarn over, pull through two loops, yarn over, pull through remaining two loops)
- inc: increase (2 stitches worked in the same stitch)
Gauge and Tension Notes
Gauge is not critical for this small accessory, but consistent tension is important to ensure the petals and leaves hold their shape well. Aim for a firm but not overly tight tension so the stuffing fits nicely without stretching the stitches.
Pattern Notes Before You Start
This project is worked in continuous rounds for the bud to avoid visible seams. The petals are formed by working grouped stitches around the petal points in the final round of the bud. The stem and leaf are crocheted separately in chains with slip stitches and joined by sewing. The key loop is crocheted and reinforced at the tulip’s top to secure the metal key ring firmly.
Step-by-Step Crochet Instructions
- Pink Tulip Bud
- R1: MR, 6 sc into ring (6)
- R2: inc in each stitch around (12)
- R3: (sc, inc) repeat around (18)
- R4–R6: sc in each stitch around (18), stuff firmly but avoid stretching
- Petal Points (Repeat 3 times)
Using 6 stitches per petal point:- sl st in next stitch
- sc in next stitch
- hdc in next stitch
- (dc, ch 2, sl st in 2nd chain from hook, dc) in next stitch for the petal peak
- hdc in next stitch
- sc in next stitch
Fasten off leaving a long tail. Thread the tail through the inner base of the three petal points and pull gently to close the center opening, keeping points visible. Secure tightly.
- Green Stem
- Ch 12
- Starting in second chain from hook, sl st across all 11 chains
- Fasten off leaving a long tail for sewing
- Sew one end securely to the bottom center of the bud
- Green Leaf
- Ch 8
- Starting second chain from hook, work: sl st, sc, hdc, dc, hdc, sc
- In the last chain, work 3 sc
- Continue on the opposite side of chain: sc, hdc, dc, hdc, sc, sl st
- Join with sl st and fasten off
- Wrap leaf base around upper stem and sew in place, leaving leaf tip free
- Key Loop
- Join green yarn at tulip top center between two petals
- Ch 12, sl st back into starting point
- Reinforce with several stitches
- Fasten off and attach metal key ring through loop
- Weave in all ends carefully and check for secure joins
Assembly and Finishing
Carefully sew the stem to the bottom of the bud ensuring it is firmly attached to avoid pulling free. Attach and sew the leaf around the upper part of the stem for stability and a natural shape. When closing the petal points, threading the tail through and pulling gently is crucial to keep petals shaped without a hole in the center. Use a yarn needle to weave in tails neatly along the shaped edges. Reinforce the key loop with extra stitches before clipping yarn to secure the metal key ring safely.
Helpful Tips
- Use a stitch marker on the first stitch of each round to keep track and avoid counting mistakes.
- Stuff the bud firmly but gently to avoid distorting the stitches and shaping.
- When forming the petals, be careful not to pull the closing thread too tightly as this can distort the petal shapes.
- Wrap the leaf base snugly but allow the tip to point freely for a natural look.
- Check all joins for security, especially attaching the key ring loop, to ensure durability.
- For a polished finish, trim any fuzz or uneven yarn ends after weaving in.
Common Mistakes to Avoid
- Pulling stuffing too tight and stretching the stitches — stuff firmly but gently.
- Skipping the reinforcement stitches on the key loop, which can cause the key ring to detach.
- Forgetting to close the magic ring tightly at the start, leaving a hole at the bud center.
- Uneven tension in petals causing asymmetrical shaping — keep tension even.
- Incorrect stitch counts in the petals can lead to misshapen points; double-check as you go.
Customization Ideas
- Use variegated pink yarn for a multi-toned tulip bud for extra dimension.
- Swap cotton yarn for a fluffy or textured yarn for a soft, fuzzy look.
- Make the leaf in a different green shade or add small embroidered veins.
- Experiment with larger hooks and thicker yarn to create a bigger statement keychain.
- Add a bead or small charm at the base of the tulip for decorative flair.
How to Use or Display This Crochet Project
This tulip keychain charm is perfect for adding a handmade touch to your keys or bag zippers. It’s small and lightweight, so it won’t weigh down your accessories. It also makes a sweet, thoughtful gift for friends and family, especially when paired with other handmade charms or gifts. Display it on a workspace or gift basket as a subtle springtime accent, or bundle it with seasonal crochet projects for a cheerful crochet bouquet.
Care Instructions
Hand wash gently in cool water with mild detergent to preserve the cotton yarn’s color and shape. Avoid wringing or twisting to prevent distortion. Lay flat to dry naturally. Store away from direct sunlight and moisture to keep colors bright and prevent mildew.
Frequently Asked Questions
Q: Can I use acrylic yarn instead of cotton?
A: Yes, you can substitute acrylic yarn, but cotton gives better stitch definition and a firmer shape for this pattern.
Q: How do I close the magic ring tightly?
A: Pull the starting tail firmly after your first round of stitches to close the hole, preventing a visible gap in the bud center.
Q: Can I skip stuffing?
A: It’s not recommended. Stuffing helps the bud maintain its shape and keeps the petals neat.
Q: How do I know when to stuff?
A: Stuff after completing round 6, before making the petal points, so the bud is firm but the stitches are not stretched.
Q: Can I scale the pattern to make larger versions?
A: Yes, using thicker yarn and a larger hook will produce a bigger tulip, but adjust stuffing accordingly to keep shape.
Final Thoughts
This tulip keychain charm is a delightful project that balances simplicity with shaping details to create a beautifully finished accessory. It’s perfect for makers looking for a sweet, practical item to gift or keep, and its charming design brings a little spring cheer all year round. With a bit of stuffing and careful finishing, this pattern is sure to become a favorite quick project in your crochet rotation.



